Pages

Showing posts with label vegetarian. Show all posts

Monday, June 27, 2011

Two Simple Summer Salads

It seems that in life, most people follow a similar journey when a comes to salads and their dressings. Of course, at the start, salads are that vile green thing Mom eats while you carefully pick out the faux marshmallows from a box of Lucky Charms. You wouldn't even think about the dressing she uses because you may barf.

One day you are tricked into eating a carrot dipped in Ranch dressing and suddenly a few more formerly revolting vegetables are palatable (even though you're really only tasting Ranch). At restaurants, if a house salad is mistakenly served as a side to your chicken fingers, you would ask for double Ranch and gingerly eat a few bites of now-white lettuce.

At this point, the road diverges slightly. Either one, you become a salad eater or two, you do not. Typically if you become a salad eater this early on, you are an overly weight-conscious, eager-to-please first date, overly self-aware teen. Maybe you expand your dressing horizons to the realm of vinaigrettes. If you stop eating salad, it's probably because you realize most cream dressings actually counteract the health benefits of salad and why eat limp, tasteless lettuce that has been sitting in the fringe turning liquidy for days in your fridge or a restaurant's?

Fast-forward and here I am today. I happened to take the road of no salads for most of my post-Ranch life because I felt I could choose many many other healthy dishes that I would actually enjoy eating. Just the thought of sliced American cheese on torn head lettuce with flavorless Kroger-bought tomatoes makes me cringe. But now I understand that salads and dressings can be fresh, imaginative and delicious in ways I could have never dreamed.

My first realization occurred when I started being more adventurous with dressings at restaurants. I would order a incredible feta dressing or balsamic vinaigrette, and so impressed, I'd pop over to the grocery store, pick out what seemed like the same thing, spend too much money on it and only use it once when to my horror it would be disgusting and nothing close to the restaurant experience. This was when I began making simple dressings at home that I could alter slightly for different salads and always prefered.

My second realization came about when I started making salads with fixings other than the blandest of lettuce. Adding beans, nuts, mache or mizuna, a little arugula or even some fruit really transformed my definition of salad for the better.  Now I can say confidently that I'm a salad convert...thought it will never be the food I request for my last meal ;)

Basil Vinaigrette
a rough base to play around with

1/4 cup olive oil
2 Tbsp. red wine vinegar
Tsp. Dijon mustard
2 cloves garlic, minced
handful of basil, chopped
salt and pepper to taste
optional: lime juice, hot pepper

Whisk or shake all ingredients together and let mull in the fridge before serving.


Now for my two simply summer salad suggestions...but first, let me mention my third and perhaps most critical salad-related revelation. I learned to buy my produce, particularly tomatoes and greens, at the farmers market. The difference in quality is striking and the varieties available to you will be unlike any you'll see at your mass market supermarkets.


Bean and Tomato Salad with Basil Vinaigrette

1 lb. yellow wax beans, ends removed
Fresh cherry tomatoes, sliced in half
Basil vinaigrette

Cook beans in boiling salted water for 3 minutes, or to your desired tenderness. Plunge in an ice water bath immediately after draining. Pat dry the beans and arrange on a plate with the tomatoes. Top with vinaigrette and serve.


Kale, Tomato and Radish Salad with Basil Vinaigrette

One bunch of lacinato kale, center stems removed, cut to easily edible size
Cherokee purple tomato, sliced in quarters
Pickled radishes, sliced (or plain radishes, thought I like the tang of pickled radishes)
Basil vinaigrette

Thoroughly toss together all ingredients and eat on a hot summer day. Kale is one of the most nutritious greens available!


Do you have any favorite off-beat salads? For a few other summer salads of late, check out my Kohlrabi and Asparagus Ribbon Salad, this Asian Noodle Salad or Bon Appetit's Shaved Summer Squash Salad.

Wednesday, May 18, 2011

Italian inspiration on a cool summer night

While Blair's romantic future may be ever in question, while Serena's hips appear ever wider in ever shorter skirts, and while the number of characters Gossip Girl writers manage to write in simply to dream up an elaborate, multi-character, history-spanning deception will never cease to shock, Monday night dinners always satisfy.

This Monday marked both the first Monday night dinner of the summer as well as the last Gossip Girl episode of the season. The meal had to be fresh, part cool and part warm to fit the unseasonable weather, and most importantly, use up a hella lot of basil and other market goodies in the fridge. This is a 3-part menu so get ready for dinner party ya'll.


I'd picked up some large, green kohlrabi from my favorite farmers at Cedar Grove Farm as well as leeks, purple and green asparagus, sweet onions, and radish peas from other Athens Farmers Market vendors. It seemed only fitting to dream up a cool, raw salad to match the hot summer days ahead. I've become obsessed with kohlrabi lately, because they are in season and because I only just discovered how tasty they can be when eaten raw. And radish peas were a wholly new discovery. Apparently, radishes, when left to seed, produce pea-like pods that taste like strong radishes. In Asia, it is more common to cultivate radishes for this purpose than for the radishes we know and love here.


Cold Kohlrabi and Asparagus Ribbon Salad with Radish Peas and a Lemon Vinaigrette


2 large kohlrabi heads, julienned
Bundle of asparagus spears, purple and green if possible, peeled into ribbons
Small bag of radish peas, chopped into small discs
2 small leeks or 1 medium, julienned, optional
Shaved parmesan

Vinaigrette amounts estimated to taste
1 lemon, juiced
2-3 Tbsp. olive oil
2 tsp red wine vinegar
salt and pepper to taste


1. Julienne the kohlrabi using a food processor if you have one. Strip the asparagus into ribbons using a vegetable peeler, slicing off the heads to serve intact. Slice radish peas into small discs. Use as many as you prefer to make the salad pack the punch you desire.
2. If a touch of sweetness is something you crave, thinly slice small leeks into matchsticks and caramelize on medium low heat in a touch of olive oil or or truffle oil. I threw in a few fresh tarragon leaves as well. Allow to cool before adding to the salad.
3. Whisk together the vinaigrette ingredients, adding more olive oil or vinegar to your taste. 
4. Toss all ingredients together and serve with shaved Parmesan on top.


Now, if we were really Italian, we'd be going in reverse order, eating our salad last, but it's often at my house that whichever dish is done first, is eaten first. We did begin the evening with a bottle of wine and some crostinis. These could also be eaten as more of a main course as larger open-face sandwiches (which I did tonight with the leftovers.


Broiled Crostinis with Mozzarella, Pesto, Marinated Tomatoes and Fresh Basil


Half loaf of fresh bread, sliced thinly - we used a semolina loaf from Alfredo's Bread
3 tomatoes, sliced
Mozzarella, sliced into discs
Handful fresh basil
Balsamic
Rosemary

Pesto - makes extra for freezing and leftovers
5 packed cups of basil
4-5 cloves garlic
1/4 cup pine nuts
scant 1/4 cup sliced almonds
1/4 cup Parmesan cheese
1/3 cup olive oil, add to taste up to 1/4 cup
salt and pepper to taste
pinch of cinnamon


1. Marinate sliced tomatoes with balsamic vinegar and rosemary. 
2. Pulverize nuts and garlic in the food processor. Add the basil, Parmesan, salt and pepper, pinch of cinnamon. Pour the olive oil in as you process. Taste and adjust.
3. Turn oven on broil. Slice bread thinly into squares of half loaf slices; remove crusts. Arrange bread on a baking. Spread pesto on each slice. Top with one tomato and one tomato slice.
4. Broil until mozzarella is slightly brown and bubbling, check after 3 minutes. Slide a piece of fresh basil under each tomato and serve immediately.


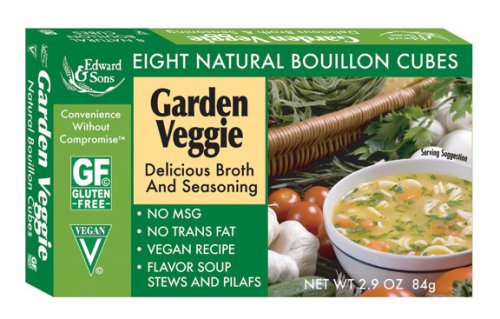
At this point we were 2 bottles of wine in and ready for a warm soup merging classical technique and seasonal tweaks to adjust for the unusually cool evening. This variation on a ribollita truly hit the spot, with layered notes of flavor, using greens on hand in the fridge, an experiment with veggie boullion and a punch of vegetarian goodness. In place of kale, I chopped up kohlrabi and beet greens. After thumbing through my copy of Super Natural Cooking Everyday, I decided to take Heidi's advice and use bouillon cubes instead of buying veggie stock since I didn't have any homemade on hand. I grabbed a veggie bouillon from the organic section at Kroger and I couldn't have been more pleased with the flavor and the price.


Vegetarian Ribollita

1/2 pound dried Great Northern beans
Kosher salt
1/4 cup olive oil
3 small yellow onions, diced
1 cup chopped carrots, about 6 small organic carrots
3 stalks chopped celery, chopped
6 cloves minced garlic
1 tsp. freshly ground black pepper
1/4 tsp. crushed red pepper flakes
3 tomatoes, chopped
Roughly 4 cups coarsely chopped greens - I used kohlrabi greens (2 bunches) and beet greens (1 bunch)
1/2 cup chopped fresh basil leaves
3 bouillon cubes in 6 cups water or 6 cups vegetable stock (I recommend Edward & Sons Garden Veggie Bouillon Cubes)
Roughly 3 cups foccacia bread cubes
1/2 cup freshly grated Parmesan, for serving

1. Soak beans overnight or boil beans for 3 minutes and let soak for 1-2 hours. Drain. Bring the beans to a boil in unsalted water then reduce to simmer for 45 minutes. Add about 1 tsp. salt and cook for another 10-15 minutes or until desired tenderness. Save the cooking liquid.


2. Meanwhile, heat the oil in a large stockpot. Add the onions and cook over medium-low heat for 7 to 10 minutes, until the onions are translucent. Add the carrots, celery, garlic, 1 Tbsp. of salt, pepper, and red pepper flakes. Cook over medium-low heat for 7 to 10 minutes, until the vegetables are tender. Add the tomatoes, greens and basil, and cook over medium-low heat, stirring occasionally, for another 7 to 10 minutes.


3. In the bowl of a food processor, puree half of the beans with a little of the cooking liquid. Add to the stockpot, along with the remaining whole beans. Add bean cooking liquid (to cups) to the stock to make 8 cups. Add to the soup and bring to a boil. Reduce the heat and simmer over low heat for 20 minutes.


4. Add the bread and simmer for 10 more minutes. Taste for seasoning and serve hot in large bowls sprinkled with Parmesan.


 Buona sera readers! Buon appetito!

Friday, March 11, 2011

Vegetarian Reuben


I've never been great at making sandwiches. It's the one food I never can seem to do as well at home. Maybe it's that I'm not good at choosing what to put in a sandwich, or maybe it's just that it's hard to keep a variety of fresh sandwich ingredients around the house to keep it exciting. Even at restaurants, I never select the build your own sandwich option because I just know the preconceived menu sandwiches will always be better.

That said, I think this vegetarian Reuben is the first real success I've had with a sandwich at home. Last night was the third night in a row I've had this for dinner! And if I didn't run out of rye bread tonight would happily be the fourth. The ingredients for the most part can be kept in the house for more than a couple of days and the result is an incredibly flavorful and filling meal that even meat-eaters will crave. I recommend doubling the recipe, even going triple if you're feeding multiple household members, so you can store the pre-prepared tofu in the fridge and enjoy Reubens all week!


Vegetarian Reuben Sandwich
Adapted from The Grit

Makes about 3 sandwiches 

1 (14 oz.) block firm or extra firm tofu
2 Tbsp. olive oil
Dash of liquid smoke (Worth the investment!)
1/3 cup soy sauce
1 tsp. freshly squeezed lemon juice (about half a lemon)
1/4 tsp. dried dill
1/4 tsp. paprika
1/4 tsp. garlic powder
Sliced marble rye bread, toasted
Sliced swiss cheese
Sauerkraut (I found canned for $0.88!)
1000 Island Dressing
Spicy mustard
Red Onion, optional
Avocado, optional

  1. First thing, get as much moisture out of the tofu as possible by draining on paper towels while you get everything else gathered and measured out - mise en place, as they say. 
  2. Cut tofu into slices (But don't worry if they fall apart by the end. I couldn't thoroughly cook them without ending up with crumbles instead. In fact, if you just cut the tofuc into cubes to begin with the result would likely be the same.)
  3. Heat olive oil over medium-high heat in a large non-stick skillet. Add tofu and toss and turn frequently until tofu begins to brown
  4. Combine a dash of liquid smoke (I used about 5 drops) with soy sauce, and add mixture to tofu with remaining spices and lemon. Toss to brown evenly and saute until tofu is very firm and slightly browned. Because of the soy sauce, it's difficult to tell when it's really browned, so I just taste pieces as it gets close to being done.
  5. Heat oven to 350 or 400 F. 
  6. Toast bread lightly. Spread mustard and dressing, one the each slice. Add sauerkraut followed by tofu and 2 slices of Swiss cheese to the bottom slice.
  7. Put second slice of bread on top of the sandwich and put in the oven for a couple minutes to melt the cheese. 
  8. Devour with a side of Guinness.


And if you want to make a full-blown restaurant-dining-at-home kind of night, go ahead and make these mock Red Lobster Cheddar Biscuits too, or even a Golden Bowl (coming soon!). You won't regret it.


Just entered this sandwich into the Scanwiches Fanwiches Contest! Wish me luck! And check out this humorous blog at http://scanwiches.com/


Friday, January 28, 2011

Last Remnants of the Garden


Last week I pulled up the last bits of my winter garden to prepare for cover crop planting. Incredibly I found a treasure trove of radishes that had flourished through the cold. Some were HUGE!

It was a true garden mystery though because I had thought, according to my little garden chart, that these were turnips the entire season. I am still baffled, even though I know it must have just been my mistake.

So what does one do with pounds and pounds of radishes? I will offer some suggestions.

Now that's a lot of radishes
My whole life, I never thought of cooking radishes. To me, they were simply a delicious snack to eat raw, perhaps in a salad. Then one day I roasted a radish (just tossed whole in olive oil, salt and pepper; cooking a 400 degree oven until fork tender), and my world changed. It started when I purchased a "Turbo radish" at the farmer's market - which is I tell you a strange beast. The woman who grew it suggested roasting. In my opinion, regular radishes are less bitter when roasted, but these crazy black radishes are worth a try.


Anyways, the point is, cooked radishes are delish. And one day in the shower I imagined how yummy caramelized radishes would be, ala caramelized onions. I had purchased some farro the week prior at the local co-op, so I planned a caramelized radish and farro dish. Farro is a pretty cool grain with a unique light crunch about it.

1. Prepare the farro according to package directions. Use stock if you want more flavor.
2. Carmelize slices of radish, half a red onion or a few boiler onions, and garlic in olive oil at medium-low heat with a little salt and pepper and maybe a touch of brown sugar. Feel free to add any vegetables you have on hand and season to your pleasure. This is very much a "contents of your fridge" kind of meal.
3. Stir together and serve. 


Has anyone ever caramelized radishes or other vegetables besides onions before? I am very interested in perfecting this sweetening art.

Saturday, December 25, 2010

White Christmas

Hello everyone!

I've sorry to have abandoned you for so long. But now I'm back and I've got so many recipes and photos of my efforts to share.

For today though, it's Christmas and the very first White Christmas of my life as well as the first in Atlanta in over 100 years!! I woke to the dreary morning we have all become accustomed to in Georgia as our sorry excuse for winter. But just like a Christmas miracle, we began opening our presents in our sunroom as usual and suddenly the snow began to fall. And it got bigger and fluffier and started sticking...and now I only fear I won't make it to see True Grit because there's actually snow on the roads.

My white house and white car seem so at home. 

This playground was my first Christmas miracle. I was probably about 5 years old, and my grandparents had come to visit from Pennsylvania. On Christmas Eve my Grandma took me out for adventures all day long until it was dark, and I eagerly awaiting sleep so that Santa wouldn't pass by my house. When morning came, we sang "Silent Night" as we walked down the stairs, carefully preparing to deliver Baby Jesus to the manager as always. But the second I rounded the corner, I could see straight down the hall to the sunroom where in my backyard, Santa had magically delivered a fully assembled, perfect playground just for me.

That year Grandpa and my Dad were Santa. And what a magical thing it was.

 Now here's a recipe to keep you warm on these (finally) cold winter nights. It's simple and delicious. And perhaps I'll whip some up with my brand new food processor (Hallelujah!)

Carrot and Fennel Soup
 
2 medium fennel bulbs with fronds (Trader Joe's sells great big ones!)
1 lb carrots, quartered lengthwise
1 medium onion, quartered
 2 garlic cloves, halved
5 tablespoons extra-virgin olive oil, divided
1/2 teaspoon sugar
2 1/2 cups vegetable broth
2 1/2 cups water
1 teaspoon fennel seeds, ground finely in a coffee grinder


Instructions:
1. Preheat oven to 450°F with rack in lowest position.
2. Chop enough fennel fronds to measure 1 tablespoon and reserve. Discard stalks and remaining fronds. 
3. Slice bulbs 1/4 inch thick and toss with carrots, onion, garlic, 3 tablespoons oil, sugar, 1/2 teaspoon salt, and 1/4 teaspoon pepper. 
4. Spread in a 4-sided sheet pan and roast, stirring occasionally, until browned and tender, 25 to 30 minutes.
5. Blend half of vegetables in a blender with broth until very smooth (or still with a little chunk in its step as I like it). 
6. Transfer to a medium saucepan. Repeat with remaining vegetables and water. Thin with extra water if you want it really soupy and simmer 2 minutes. Season with salt and pepper.
7. Meanwhile, finely grind fennel seeds in grinder and stir into remaining 2 tablespoons oil.
8. Serve soup drizzled with fennel oil and sprinkled with reserved fronds.


Wednesday, September 29, 2010

Mondays are back!


 And yes, admittedly, I'm a little late on this, since there have already been 2 weeks of  Gossip Girl, but for me and my busy self this was the first week things returned to the norm. My roomie and I cooked up a delicious feast and watched the newest Gossip Girl over a bottle of red wine. C'est perfectament!

For this special inauguration of the semester, we cooked up something quite special indeed. On the menu: boiled artichokes with hollandaise, rosemary and olive rolls, and roasted vegetable lasagna.


Appetizer: Boiled Artichokes with Hollandaise Sauce
2-4 artichokes, depending on the crowd and your appetite
3 egg yolks
1/2 lemon of fresh lemon juice
1/4 teaspoon salt
Dash cayenne pepper
1/2 cup butter, melted and bubbling

1. Start a large pot of water to boil with a dash of salt.

2. Cut the stems of the artichokes so they might stand flat. Then cut off the top inch-ish of the artichoke. Rub the cut edges with a lemon, to be used later in the Hollandaise Sauce, to prevent browning.

3. Plop the artichokes in the pot, and yes, they will float, but they need to be covered by the water. If someone has a trick to this I will love you forever. As for now I am risking my safety each time I come up with a new, probably unsafe, but heavy item to set on top of the artichokes to keep them down in the water.

4. Let them cook for about 45 minutes or until a bottom leaf pulls off readily and tastes done.
5. About 5 minutes before they are done or even just after they are done, start making the Hollandaise.
6. Add egg yolks, lemon juice, salt and cayenne pepper to the blender, and blend about 5 seconds. With blender running, and partially covering top, pour in bubbling hot butter in a steady stream. Blend until thickened, about 30 seconds. Serve immediately.


Bread: Olive and Rosemary Rolls
*Start these first because they have to rise for about 2 hours, plus prep/kneading/cooking*

1 tsp. dry active yeast [very important you use "dry active yeast" NOT "instant" or "rapid rise"]
1 tsp. sugar
1 cup lukewarm whole milk
2 1/2 cups all purpose flour
1 tsp. salt
1 tsp. olive oil
1/2 cup-ish black olives, diced
11/2 Tbsp.-ish rosemary leaves, chopped
Flour, for kneading
Olive oil, for brushing

1. Place the yeast, sugar and milk in a bowl and mix to combine. Set aside in a warm place for 5 minutes, or until bubbles appear on the surface. [In my past breads this bubbling business has always happened, but for whatever reason it didn't for me this time. Have no fear though, this bread still turned out amazing. Conclusion: if you don't get bubbles, carry on carry on.]
2. Add the flour, salt and olive oil to the yeast mixture and mix until a smooth dough forms.
3. Knead on a lightly floured surface for 5 minutes or until smooth and elastic, adding a little extra flour if the dough becomes too sticky, and luckily this dough is not too sticky to knead comfortably. Cover with plastic wrap, set aside in a warm place/on the table for 1 hour or until doubled in size. [Also to note, my dough didn't really magically double in size as usually happens in bread making, but it did expand some and this was fine too]

4. Brush 1 or 2 round cake pans with olive oil. Mine took 8in cake pan plus 2 rolls, so yeah.
5. Knead the olives and rosemary leaves into the dough on a generously floured surface. Divide into 16-ish pieces and roll into balls. Place in prepared pans, cover with a clean tea towel and set aside in a warm place for 45 minutes or until the dough is doubled in size. In the meantime, preheat the oven to 350°F.
[Now that I think about it, I don't think we let them rise this second time officially. We probably left them out for a bit before sticking them in the oven, but none of this tea cloth and doubling again business. Oh well, again they were scrumptious and perfect.]
5. Brush with the oil and bake for 20-25 minutes or until golden.


Roasted Vegetable Lasagna
One 28 oz. can of whole tomatoes
Two 14 oz. cans of fire roasted diced tomatoes
One medium onion, diced
Tsp-ish of fennel seeds
Tsp-ish of chili flakes
2 garlic cloves, minced
Slice of butter
1 container ricotta cheese
Mozzarella cheese
Fresh grated parmesan cheese
1/2 package of Lasagna noodles
[All of the following ingredients could be increased, decreased, added to, eliminated etc, according to your preference and available veggies.]
4 delicata squash, halved longwise
3 thin eggplants, halved longwise
2 packages of whole baby bella mushrooms
1/2 cup of black olives, diced (leftover from bread)
1 package frozen chopped spinach
Artichoke hearts (leftover from appetizer)

1. Preheat the oven to 450F.
2. Cut up all of your veggies as described above. Spoon out the seeds from the squash. Rub the squash, eggplant and mushrooms with olive oil, pepper, salt and oregano. Stick them all on a baking sheet and put them in the oven to roast for about 20 minutes, or until they look done. Beware that eggplant will be ready first so check on them and take them out before they crisp...like I forgot to do a little bit.
3.  Start on the sauce. Saute in olive oil the onions, fennel seeds, chile pepper flakes, butter and garlic in a large pan. Then add the cans of tomatoes, including the juices, and bring it to a boil. Once boiling bring it down to a simmer and let it go until you taste it to be ready. [Some may puree it all at this point but I found that just mashing the whole tomatoes with my wooden spoon as it cooked resulted in a delightfully chunky sauce.]
4. Mix the defrosted spinach (just like Mama made it) into the ricotta cheese and add your leftover olives from the bread too. You might just add in some chopped up artichoke hearts that you have so cleverly already prepared for another purpose.
5. Get the pasta cooked and shred the parmasan.
6. Slightly mash up the squash (keep the skin or remove to your personal preference), chop the eggplant and half or quarter the mushrooms.

7. Now for the layers. Start with sauce, then add the ricotta mixture, then noodles, then roasted veggies, then parmesan, repeat. Finally top it off with chunks of fresh mozzarella to seal it all in and make sure no pasta is exposed because it will get all crunchy then.
8. Bake in a pyrex pan for 20-40 minutes. Just check on it and when the cheese on top begins to get lightly brown and bubbly, take it out.
9. Let it rest for at least 15 minutes before eating.

P.S. I dedicate this post to Charlemagne, my cat, who helped choose what to cook this week. See?