Pages

Saturday, May 28, 2011

Baked Pepper Jelly Cream Cheese Donuts

Inspired by my favorite donuts at Ike & Jane and by the desire to make donuts without having to fry them and subsequently dispose of vast quantities of oil, I adapted a recipe for baked donuts on 101 Cookbooks to create Pepper Jelly filled donuts with a cream cheese frosting. They certainly wowed the crowd with a flavor similar to sweet rolls paired with the slight heat of the jam and the creaminess from a dab of frosting.


Baked Pepper Jelly Filled Donuts with Cream Cheese Frosting
Adapted from 101 Cookbooks. Makes 1 1/2 - 2 dozen medium doughnuts.
1 1/3 cups warm milk, 95 to 105 degrees (divided)
1 packet active dry yeast (2 1/4 teaspoons)
2 tablespoons butter
2/3 cup sugar
2 eggs
5 cups all-purpose flour
Couple pinches of nutmeg
1 teaspoon kosher salt
1 jar of pepper jelly
1 cup Confectioners Sugar
4 oz. cream cheese at room temperature
1/2 stick of butter, softened
1/2 tsp. vanilla. extract
Optional: 1/2 cup unsalted butter, melted
Optional: sugar to dust

    1. Warm milk slowly in the microwave until its about as hot as the average hot water out of your kitchen sink. But err on the side of less warm because if the milk's too hot you may kill the yeast. Place 1/3 cup of the warm milk into a large bowl. Stir in the yeast and set aside for five minutes or so. Stir the butter and sugar into the remaining cup of warm milk and add it to the yeast mixture. With a fork, stir in the eggs, nutmeg, and salt. Add the flour and stir just until the flour is incorporated. Pour the mixture into a food processor and pulse with the dough blade; otherwise use a hand or stand mixer on medium. If your dough is overly sticky, add flour a few tablespoons at a time. Too dry? Add more milk a bit at a time. The dough should pull away from the sides of the mixing bowl and eventually become supple and smooth. I actually skipped this last step for lack of counter space and things turned out fine, but do the following if you choose: turn it out onto a floured counter-top, knead a few times (the dough should be barely sticky), and shape into a ball.

    2. Transfer the dough to a buttered (or oiled) bowl, cover, put in a warm place. Heidi Swanson suggested turning on the oven at this point and setting the bowl on top. I left mine in the dining room and obviously (see image below) things rose just fine. Let rise for an hour or until the dough has roughly doubled in size.
     
    3. Punch down the dough and roll it out to about 1/2-inch thick on a floured surface. Use a 2-3 inch cutter  (cookie cutter, wine glass, etc) to stamp out circles. Transfer the circles to a parchment-lined baking sheet. If you are not creating filled donuts, here is when you would stamp out the smaller inner circle for the hole. Over estimate how big the hole needs to be because a small hole will simply expand together when cooking. Cover with a clean cloth and let rise for another 45 minutes. If you are not baking them all right now, leave the shaped donuts on a baking sheet, covered, overnight for second baking the next day. They are best when eaten immediately. An hour before you are ready to bake the donuts, take them out and let rise in a warm place before baking.
     
    4. Bake in a 375 degree oven until the bottoms are just golden, 8 to 10 minutes - start checking around 8. In this case, under-baking is better than over-baking.

    5. Remove the doughnuts from the oven. Optional: brush with melted butter and sprinkle lightly with sugar. Pipe jelly into the insides and spread cream cheese frosting on top.

    Friday, May 27, 2011

    Chocolate Cake: Two Ways


    I'll be the first to admit that it took me a long while to become a chocolate cake person. Chocolate ice cream, no. Chocolate cake, yes. But as with most things we didn't like as kids, it was because I hadn't had a truly good chocolate cake until later in life. I've since realized that for me, the two key components that determine if I'll like (and later crave) a chocolate cake are moistness and subtle coffee flavor.

    Today I want to share my two favorite chocolate cake recipes - one vegan and one not. Yes, you heard me, a vegan cake, a vegan cake that puts many typical chocolate cakes to shame. The other cake is classic chocolate cake recipe I learned in a French cooking class. These are my two standbys and I hope they can become yours.


    Vegan Chocolate Death Cake
    from The Grit

    4 1/2 cups all-purpose flour
    3 cups sugar
    1 cup cocoa powder
    1 Tbsp. baking soda
    2 tsp. salt
    1 1/2 cups vegetable oil
    2 Tbsp. pure vanilla extract
    3 cups strong brewed coffee
    1/4 cup cider vinegar

    Icing
    1 12oz. package firm silken tofu
    3 cups vegan chocolate chips (many semisweet brands contain no dairy)

    A blend of wholesome soybeans, water and natural coagulant is poured into each of these little boxes. Once sealed, the mixture magically transforms into creamy, silken tofu right in the box. Cool, huh?
    1. Preheat oven to 350. Grease three 9 inch round cake pans, dust with flour and line bottom with parchment paper.
    2. Sift together dry ingredients in a large bowl. Add oil and vanilla extract. Beat together on low until fully combined. On medium speed, gradually blend in coffee. When the mixture is smooth, add vinegar and blend on low speed until just combined.
    3. Divide batter into the pans and bake 20 to 25 minute or until a knife or toothpick in the center comes out clean. Let cool completely before frosting and eating.
    4. For icing: Drain excess fluid from silken tofu, crush and place in a medium saucepan with chocolate chips. Stir together over medium hear until chocolate is very soft. Puree in a food processor until fully blended. Cool  before frosting. Top with edible purple violets for a lovely look.


    Classic Chocolate Cake

    butter, for grreasing the pans
    1 3/4 cups all-purpose flour
    2 cups sugar
    3/4 cups good cocoa powder
    2 tsp. baking soda
    1 tsp. baking powder
    1 tsp. kosher salt
    1 cup buttermilk, shaken (If you're tired of buttermilk going bad between cakes, try using Dry Powdered Cultured Buttermilk Blend at 4 Tbsp. to a cup of water. Don't forget to refrigerate after opening.)
    1/2 cup vegetable oil
    2 large to extra-large eggs, at room temperature (Put in hot water for 1 minute if in a hurry)
    1 tsp. pure vanilla extract
    1 cup freshly brewed hot coffee


    Icing
    1/2 cup butter
    1 cup dark brown sugar
    1/3 cup heavy cream, or more if needed
    1 16oz. bow confectioner's sugar
    1 tsp. pure vanilla extract

    1. Preheat the oven to 350. Butter and flour two 8 inch round cake pans. Line the bottoms with parchment paper.
    2. Sift together the flour, sugar, cocoa, baking soda, baking powder and salt. Mix gently with a fork until combined.
    3. In another bowl, add the vanilla to the eggs. Then add the buttermilk and oil and combine.
    4. Slowly add the wet ingredients to the dry using a stand mixer if you have one or beat on low with a hand mixer. Still on low, slowly add the coffee and stir just until combined.
    5. Pout the batter into the pans and bake for 35 to 40 minutes until a knife or toothpick comes out clean. Cool for 30 minutes before frosting and/or eating.
    6. For icing: Melt butter in a saucepan over medium heat and stir in brown sugar and cream. Bring to a boil and transfer to mixing bowl. Add confectioners' sugar and vanilla. Beat with a mixer until it reaches spreadable consistency. Add more heavy cream, a tablespoon at a time, to reach the desired thickness. Frost and sprinkle with nuts if desired.

    Friday, May 20, 2011

    Fried Green Tomatoes and Homemade Pita Chips

    Sometimes a sweet and simple meal is just right for a relaxing day. At the store today I spotted some green tomatoes and realized how long it has been since I'd eaten one...and more importantly how few times in my life I have eaten them altogether. You see, although I've lived in the south all my life, my family is yankee through and through. I grew up on corn meal mush and cream of wheat instead of grits; johnny cake instead of cornbread; and certainly no fried green tomatoes. To make matters worse, I spent my childhood in Marietta, where cultural food experiences are lacking almost as much as Southern accents. It wasn't until college and a few trips to Albany, Georgia that I discovered the magic of good grits and the brilliance in fried everything (on occasion). I'm still learning, but here's what I considered a great fried green tomato. And in honor of Southern cooks everywhere, I used Duke's Mayonnaise for my dip.


    Panko-Fried Green Tomatoes with Dill, Horseradish and Mayonnaise Dip

    1 large green tomato
    1 egg, lightly whipped
    Panko for coating
    Vegetable oil, for frying

    1/4 cup Duke's Mayonnaise
    1 Tbsp. horseradish
    1/2-1 tsp. fresh dill, minced
    pepper to taste


    1. Remove the core and thinly slice a green tomato. Heat 1/2 inch of oil in a small frying pan on medium.
    2. Stir together the mayo, horseradish, dill and pepper. Taste and adjust if necessary. 
    3. Dip each slice in egg, then coat with panko on both sides. Place in hot oil, about 2 minutes on each side, or until brown and long enough to cook the tomato to sweetness.


    See, wasn't that easy? And delicious! But if you're like me, you can never settle for just making one thing. I saw some whole grain pita bread in the "Oops we over baked" section and decided to make pita chips as my aunt did last weekend. Although they take a bit more time then purchasing and opening a bag of store bought pita chips, I guarantee these are worth the time. They are more flavorful, you have the creativity to invent your own flavors, and they are crisp but not rock hard like the ones at the store. I opted for Parmesan, rosemary and salt pita chips.


    Baked Parmesan and Rosemary Whole Grain Pita Chips

    1 bag of whole grain pita bread
    Roughly 1/2 cup shredded Parmesan
    Dried rosemary
    Kosher salt and pepper
    Olive oil


    1. Preheat oven to 325.
    2. Slice off the outer edge of each pita such that you can separate the two halves then cut each into 5-6 triangles.
    3. Brush olive oil on both sides of each triangle. Sprinkle cheese and a small pinch of salt, pepper and rosemary onto each chip.
    4. If possible, arrange on a wire rack to allow optimal air circulation and crispiness. If not, baking straight on a baking sheet should be fine. Bake for roughly 12 minutes. Enjoy plain, with your favorite dip or even the extra dip from the fried green tomatoes!

    Wednesday, May 18, 2011

    Italian inspiration on a cool summer night

    While Blair's romantic future may be ever in question, while Serena's hips appear ever wider in ever shorter skirts, and while the number of characters Gossip Girl writers manage to write in simply to dream up an elaborate, multi-character, history-spanning deception will never cease to shock, Monday night dinners always satisfy.

    This Monday marked both the first Monday night dinner of the summer as well as the last Gossip Girl episode of the season. The meal had to be fresh, part cool and part warm to fit the unseasonable weather, and most importantly, use up a hella lot of basil and other market goodies in the fridge. This is a 3-part menu so get ready for dinner party ya'll.


    I'd picked up some large, green kohlrabi from my favorite farmers at Cedar Grove Farm as well as leeks, purple and green asparagus, sweet onions, and radish peas from other Athens Farmers Market vendors. It seemed only fitting to dream up a cool, raw salad to match the hot summer days ahead. I've become obsessed with kohlrabi lately, because they are in season and because I only just discovered how tasty they can be when eaten raw. And radish peas were a wholly new discovery. Apparently, radishes, when left to seed, produce pea-like pods that taste like strong radishes. In Asia, it is more common to cultivate radishes for this purpose than for the radishes we know and love here.


    Cold Kohlrabi and Asparagus Ribbon Salad with Radish Peas and a Lemon Vinaigrette


    2 large kohlrabi heads, julienned
    Bundle of asparagus spears, purple and green if possible, peeled into ribbons
    Small bag of radish peas, chopped into small discs
    2 small leeks or 1 medium, julienned, optional
    Shaved parmesan

    Vinaigrette amounts estimated to taste
    1 lemon, juiced
    2-3 Tbsp. olive oil
    2 tsp red wine vinegar
    salt and pepper to taste


    1. Julienne the kohlrabi using a food processor if you have one. Strip the asparagus into ribbons using a vegetable peeler, slicing off the heads to serve intact. Slice radish peas into small discs. Use as many as you prefer to make the salad pack the punch you desire.
    2. If a touch of sweetness is something you crave, thinly slice small leeks into matchsticks and caramelize on medium low heat in a touch of olive oil or or truffle oil. I threw in a few fresh tarragon leaves as well. Allow to cool before adding to the salad.
    3. Whisk together the vinaigrette ingredients, adding more olive oil or vinegar to your taste. 
    4. Toss all ingredients together and serve with shaved Parmesan on top.


    Now, if we were really Italian, we'd be going in reverse order, eating our salad last, but it's often at my house that whichever dish is done first, is eaten first. We did begin the evening with a bottle of wine and some crostinis. These could also be eaten as more of a main course as larger open-face sandwiches (which I did tonight with the leftovers.


    Broiled Crostinis with Mozzarella, Pesto, Marinated Tomatoes and Fresh Basil


    Half loaf of fresh bread, sliced thinly - we used a semolina loaf from Alfredo's Bread
    3 tomatoes, sliced
    Mozzarella, sliced into discs
    Handful fresh basil
    Balsamic
    Rosemary

    Pesto - makes extra for freezing and leftovers
    5 packed cups of basil
    4-5 cloves garlic
    1/4 cup pine nuts
    scant 1/4 cup sliced almonds
    1/4 cup Parmesan cheese
    1/3 cup olive oil, add to taste up to 1/4 cup
    salt and pepper to taste
    pinch of cinnamon


    1. Marinate sliced tomatoes with balsamic vinegar and rosemary. 
    2. Pulverize nuts and garlic in the food processor. Add the basil, Parmesan, salt and pepper, pinch of cinnamon. Pour the olive oil in as you process. Taste and adjust.
    3. Turn oven on broil. Slice bread thinly into squares of half loaf slices; remove crusts. Arrange bread on a baking. Spread pesto on each slice. Top with one tomato and one tomato slice.
    4. Broil until mozzarella is slightly brown and bubbling, check after 3 minutes. Slide a piece of fresh basil under each tomato and serve immediately.


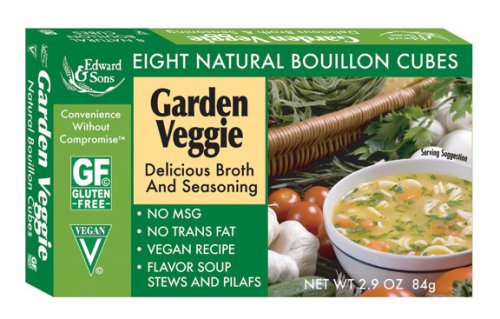
    At this point we were 2 bottles of wine in and ready for a warm soup merging classical technique and seasonal tweaks to adjust for the unusually cool evening. This variation on a ribollita truly hit the spot, with layered notes of flavor, using greens on hand in the fridge, an experiment with veggie boullion and a punch of vegetarian goodness. In place of kale, I chopped up kohlrabi and beet greens. After thumbing through my copy of Super Natural Cooking Everyday, I decided to take Heidi's advice and use bouillon cubes instead of buying veggie stock since I didn't have any homemade on hand. I grabbed a veggie bouillon from the organic section at Kroger and I couldn't have been more pleased with the flavor and the price.


    Vegetarian Ribollita

    1/2 pound dried Great Northern beans
    Kosher salt
    1/4 cup olive oil
    3 small yellow onions, diced
    1 cup chopped carrots, about 6 small organic carrots
    3 stalks chopped celery, chopped
    6 cloves minced garlic
    1 tsp. freshly ground black pepper
    1/4 tsp. crushed red pepper flakes
    3 tomatoes, chopped
    Roughly 4 cups coarsely chopped greens - I used kohlrabi greens (2 bunches) and beet greens (1 bunch)
    1/2 cup chopped fresh basil leaves
    3 bouillon cubes in 6 cups water or 6 cups vegetable stock (I recommend Edward & Sons Garden Veggie Bouillon Cubes)
    Roughly 3 cups foccacia bread cubes
    1/2 cup freshly grated Parmesan, for serving

    1. Soak beans overnight or boil beans for 3 minutes and let soak for 1-2 hours. Drain. Bring the beans to a boil in unsalted water then reduce to simmer for 45 minutes. Add about 1 tsp. salt and cook for another 10-15 minutes or until desired tenderness. Save the cooking liquid.


    2. Meanwhile, heat the oil in a large stockpot. Add the onions and cook over medium-low heat for 7 to 10 minutes, until the onions are translucent. Add the carrots, celery, garlic, 1 Tbsp. of salt, pepper, and red pepper flakes. Cook over medium-low heat for 7 to 10 minutes, until the vegetables are tender. Add the tomatoes, greens and basil, and cook over medium-low heat, stirring occasionally, for another 7 to 10 minutes.


    3. In the bowl of a food processor, puree half of the beans with a little of the cooking liquid. Add to the stockpot, along with the remaining whole beans. Add bean cooking liquid (to cups) to the stock to make 8 cups. Add to the soup and bring to a boil. Reduce the heat and simmer over low heat for 20 minutes.


    4. Add the bread and simmer for 10 more minutes. Taste for seasoning and serve hot in large bowls sprinkled with Parmesan.


     Buona sera readers! Buon appetito!